Main Content
Moving to Mouse Project
A round up of the code used can be found here.
Welcome to Foundation Flash once again. In today's tutorial, a rewrite of an AS2 tutorial, I am going to teach you about the setInterval function, and I will teach you how to make something greatly similar to this:
I'm going to start with a brief explanation of the setInterval function. It works in conjunction with a custom function, and is constructed like this:
var Intervalname = setInterval(Functionname, Intervaltime)
What it does is carry out a function every "x" number of milliseconds. In case you don't know, that is a thousandth of a second. So, say I had a function called "dosomething", and I wanted that function to be carried out every 5 seconds. How would I do that? With a setInterval. So, I'll call my interval "howLong", and assign it that function and time:
var howLong = setInterval(dosomething(), 5000)
Easy, eh? So, let's put it into action by making our little mouse following warpy thing. First, make sure to set your FPS up a bit in the properties panel. Create a new Flash project, calling the class "Circle". In the .fla, set the document class to "Circle". Now we only have to code it. Go to the .as file and type:
package {
        import flash.display.MovieClip;
        import flash.events.*;
        import flash.utils.*;
        public class Circle extends MovieClip {
                public var count:int = 0;
What we just did was to open the package, import all the necessary components (not the flash.utils, which, among many other things, deals with timings. We then create a variable for holding the count of circles on screen.
             public function Circle() {
                        var blah = setInterval(init, 10);
                }
We then set an interval called "blah", which carries out the "init" function every 10 milliseconds. This init code (coming up now) will create a new ball every 10 milliseconds, and remove the earliest ball that exists.
private function init() {
        var thiscircle:MovieClip = new MovieClip;
        thiscircle.graphics.beginFill(0x0000FF);
        thiscircle.graphics.drawCircle(0,0,1);
        thiscircle.graphics.endFill();
        thiscircle.x = Math.floor(Math.random()*550);
        thiscircle.y = Math.floor(Math.random()*400);
        thiscircle.alpha = Math.random();
        thiscircle.scaleX = Math.floor(Math.random()*10);
        thiscircle.scaleY = thiscircle.scaleX;
        thiscircle.addEventListener(Event.ENTER_FRAME,onEnterFrameMove);
        addChild(thiscircle);
        count++;
        if (count > 60) {
                removeChildAt(0);
        }
}
Phew! That's a load. However, we have already seen most of it. Lines 3,4 and 5 create a nice, smallish blue circle, as we saw in the earlier drawing tutorials. 6 and 7 set the starting position of the new circle to any random place on screen. The alpha is a value between 0 and 1 (was between 1 and 100 in AS2) which we have set to be random. This "alpha" is the transparency of the circle. Line 9 set the width of the ball to between 0 and 10, line 10 duplicates that figure as the height also. Line 11 create the event listener (one for every ball), and line 12 of course add the circle. Line 13 makes the count bigger by 1.
The if statement is perhaps one of the more interesting parts to this. Count started at 0 (remember?) and will go up one after every ball. This if makes sure that there are also 60 circles on screen at any one time. Every time we add another circle and yet remove one, but only removing them if there are 60 on screen. If you remember the tutorial about depth, you will know that by taking off the circle at the bottom of the pile (0), everything else will fall down a place, so a new circle will become (0). This is to free up memory, as the Flash would freeze very quickly if there were thousands of duplicated Movie Clips all over the stage.
But now we have to carry out the movement code. So let's continue and move on to the enter frame stuff:
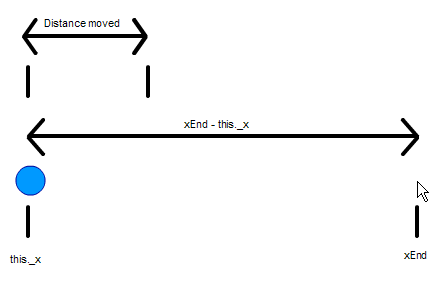
                     private function onEnterFrameMove(event:Event) {
                        var me = event.target;
                        var yEnd = mouseY;
                        var xEnd = mouseX;
                        me.x += (xEnd-me.x)/4;
                        me.y += (yEnd-me.y)/4
                }
        }
}
This uses some complicated maths, but is nothing new. It first make two values (yEnd and xEnd) equal to the x and y position of the mouse. These co-ordinates are where the Movie Clip will end up. Hence the name. Then, it makes it so that every frame, the Movie Clip will get a forth closer to the mouse, which is quite fast considering our frame rate is 30 fps.Iit does this by finding the Movie Clip's x value, and adding on: the final x position subtract the ending x position divided by 4. And if this ends up as a minus number, then obviously, the Movie Clip would move backwards. This image should help you understand:
And if you do, well, that's it, I hope you've learned something from this tutorial, and I hope you can find a way to use it in your own Flash work. The full source code is also available. Thank you for reading this,
Leon.